My attempt at a technique taught by Dean Collins for photographing beams of light.
Light itself is invisible. Think of your car headlights. You don't see the light coming out of the headlights, but rather the areas where it hits.
To photograph it, you make the light beam visible by making it "hit" something in all the areas you want it to show up in your photograph. Pretty simple concept and pretty simple to do.
I tried 2 different ways. Depending on how wide or fine your beam of light/laser is, and what the rest of your environment is like, you should use the one that makes more sense. You should, obviously, familiarize yourself with both.
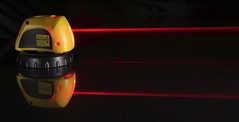
For both shots, I lit the Level with 2 flashes (details further down), and turned the laser on. For the smoke shot, I puffed some cigarette smoke in the path of the laser. For the paper shot, I moved a piece of paper in the laser's path, moving it smoothly across the beam.
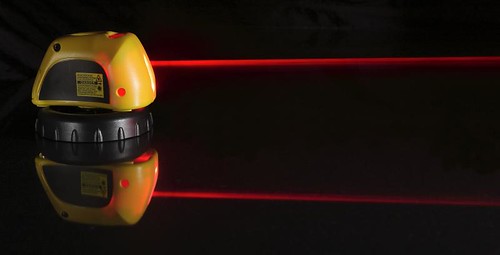
- Smoke(photograph on top). The beam is much smoother, and as the smoke goes into crevices, there are no gaps. It is less brighter than paper, so you need to shoot at a bigger aperture. Puffing smoke, it also took longer to illuminate it. A smoke machine may be faster. For my aperture/shutter speed combination (20 secs @ f/8), I had to turn the lights off to kill the ambient.
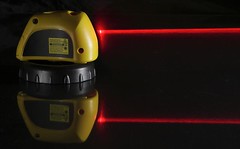
- Piece of paper. Using a piece of regular paper, I seem to have picked up all the textures. Since the front of the Laser Level is curved, it was hard to get a smooth line close to it. On the other hand, you can shoot at a smaller aperture - so ambient light is not as much of a problem. Also, it was much faster to move a piece of paper through the beam path. (5 secs @ f/16).
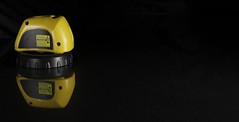
I did a simple set up in my living room. Click on it to go to Flickr and see the notes explaining the equipment.
The 550 EX is the main light, and the snooted 430 EX is the fill. Both were triggered by Cactus V2s wireless triggers.

I did the paper shot first. To get the laser to show up nice and bright, I chose f/16 as the starting point. Next step is adjusting the two flashes. You can choose to meter them (if you have a flash meter) or just do some trial and error shots. I have a meter, so I prefer using that obviously.
For the smoke shot, I tried f/8 for the laser, and was happy after a quick test. Then I set up the other flashes to give me similar results at f/8 (as opposed to f/16 as I had done previously)
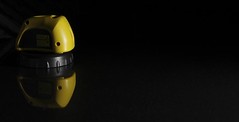
Here's what the key light looked like on its own:
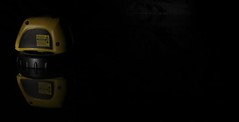
and then the fill light:
and here is how it looked with both the key and fill lights
Once the level is all lit up, then it is just a matter of making sure to turn the laser on, and using either the smoke or the paper technique (or anything else you can think of), and taking the photograph.
Caveats
- When I was shooting the smoke, I picked up a lot of ambient light. I had to turn off the lights to get a shot that was only illuminated by the flashes and laser.
- I cloned out a reflection of the laser that got picked up - again, I think because of the shot settings (bigger aperture, longer shutter speed). Pretty easy; I used Stamp Tool in Canon Digital Photo Professional.
To learn more about flash photography, visit Strobist.com.
To see more of my Strobist shots, check out my Strobist set on Flickr.
I'll be your first comment! I saw the discussion of this over on the Strobist discussion thread. Thank you for taking the time to post this. It was very well written and presented (I thought). I'll check out your other posts later, when I have time.
ReplyDeleteTony
Thanks Tony. I appreciate it. I'm just trying to give back a little, having learned so much from blogs and tutorials myself.
ReplyDelete