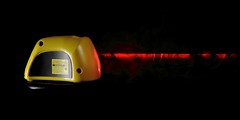
Trying out some "product" type shots.
I wanted to shoot this with a black background, and show only the instrument and the laser light coming out of it. This gets slightly tricky as the laser is only illuminated when it hits something - just turning the level on does not show any light.
I used 2 flashes to light the level, and a white piece of paper cut into strips on one side to light the laser, and a black piece of fabric as the background and bottom. Next time, I'll try to remember to take a setup shot as well, so that it's easier to explain :-)
I also used a light/flash meter. The meter helps you get exact readings very easily and saves you a bunch of time. The shot can be done without it, but just takes more trial and error.
(I am writing this assuming that you have a basic understanding of photography, and understand the concepts of Aperture, Shutter Speed, etc.)
The process is as follows:
- Using a light meter, I metered the laser light. It came to f/16. That means that if the camera is set to Aperture value = 16, and the laser is illuminated, it will be exposed correctly.
- The Key (main) Light.
I then used a "snooted" flash on the left side. A snoot is a tube put over the flash, so that the light from the flash is limited to a small area. This was done so that the light only hits the Level, and not the area around it. I metered this flash at f/16 also.
This means that shooting at f/16 (camera aperture = 16), the laser light and area of the Level hit by light from the flash will be exposed correctly.
Taking a shot with this flash set up, will show only the brighter part of the Level. The shadowy area of the Level will be completely dark as no light is hitting it.
- The Fill light.
To make these dark areas more visible, I used a second flash.
I metered it at f/11 by adjusting the distance and flash power. I held this flash in my hand - to the right and above the level.
Why meter this flash at f/11? Higher aperture numbers mean smaller apertures. Making the aperture bigger means more light coming in vs. a smaller aperture. The fact that this flash meters at f/11 means that to correctly expose the area hit by this flash's light, the aperture should be f/11. f/11 is bigger than f/16.
By metering a flash at f/11, and then shooting the photograph at f/16, you are underexposing the area illuminated by that flash. This is used to create darker areas in the photograph.
Keeping the room dark, I could shoot at a relatively long shutter speed. The flashes fire instantaneously, and the exposure of the areas that are hit by the flashes is not affected by the length of the shot (shutter speed).
- Now the interesting part. To show the laser light, I used a technique I learned from Dean Collins. You turn the laser on, and while the photograph is being taken, wave the piece of white paper in its path. Remember, the laser is invisible until it hits something. Every time the laser hits the paper, it makes a red spot. Waving the paper in front of the laser made many, many of these red spots that show up as the line in the photograph.
Some minor editing on the computer - sharpening, cropping, etc., and all done.
Please ask any questions, or requests for clarification in the comments.
To learn more about flash photography, visit Strobist.com.
To see more of my Strobist shots, check out my Strobist set on Flickr.
No comments:
Post a Comment